Creating an AWS S3 shield with Varnish Enterprise
Introduction
Amazon S3 is short for Simple Storage Service, and is an object storage product on Amazon Web Services. It is accessed using the HTTP protocol, and is very well integrated in a lot of products and solutions.
One could consider S3 as the industry standard for storage in the Cloud: not necessarily from a product perspective, but because the protocol and API that S3 uses, has become somewhat of a standard that other HTTP-based storage products also support.
Amazon S3 is well known for its scalability, ease-of-use, global accessibility and pay as you grow payment model. These are some of the typical value propositions of the Cloud. However, there are some caveats, and in this tutorial we’re going to explain how Varnish Enterprise can be used as an S3 shield to circumvent these caveats.
Why do you need an S3 shield?
Despite the almost infinite scale of the Cloud, performance is not a guarantee. S3 prioritizes scalability and resilience over performance and latency.
And there’s a cost associated with the usage of S3, both from a storage and consumption perspective. Cloud egress charges are a hot topic, and also apply to S3: the more data you pull from S3, the more it could potentially cost you.
Let’s talk about performance and latency first.
Performance and network latency
The locality of your S3 bucket has an impact on your perceived performance and the associated network latency when requesting objects from S3. An S3 bucket is hosted in a specific region where AWS has their datacenters.
Pulling data from S3 in that same region will be fast, because the data is close. But as soon as you fetch objects from other locations, the performance can drop. For inter-region AWS data retrieval, multi-cloud access, or even requests from on-premise service, network latency can increase, and performance can drop.
Take for example, the following diagram:
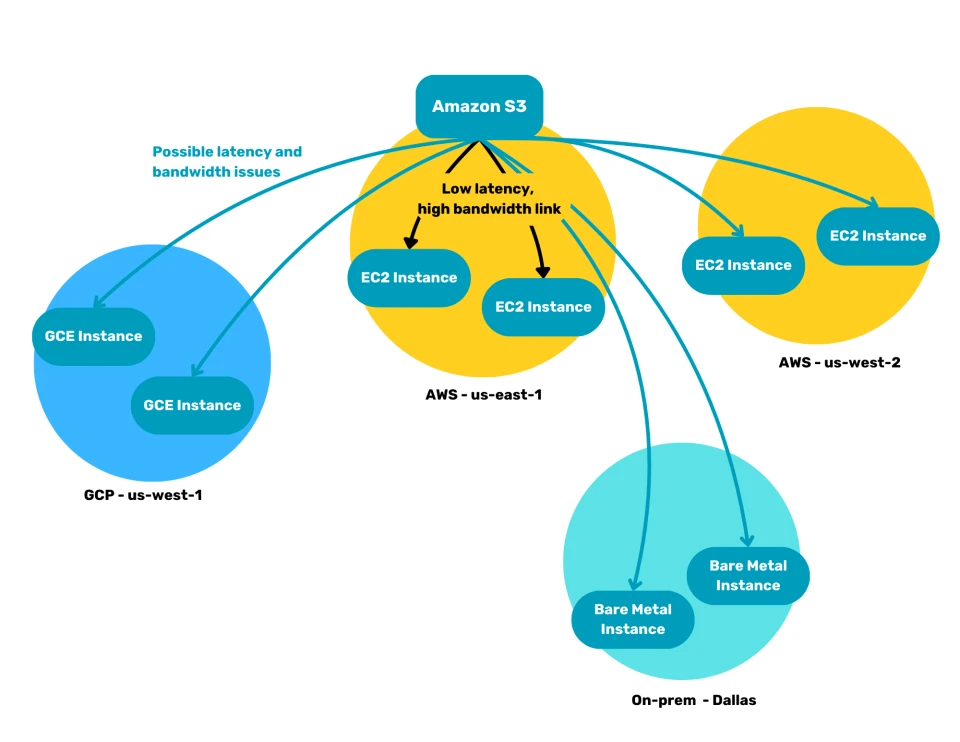
- The S3 bucket is hosted in the AWS
us-east-1data center. - Accessing the S3 bucket from EC2 compute instances in the same region will be fast.
- Accessing that same S3 bucket from the
us-west-2data center can result in increased network latency, and reduced performance. - This latency can also occur when fetching that same content from Google’s
us-west-1datacenter. - This example environment even features bare metal servers in an on-premise in Dallas, where data is also fetched from that S3 bucket.
The network that connects the various sites is a shared resource, and doesn’t offer any guarantees in terms of throughput and latency.
Cloud egress charges
Cloud services come at a cost, a flexible and variable cost, with many aspects that control the total price. This also applies to Amazon S3.
Not only is there a storage price per gigabyte, you also get charged for the number of requests you send to the S3 API. This is all pretty straightforward and reasonable.
What can really increase the price, is data transfer outside of the AWS region where your S3 bucket is hosted.
Let’s revisit our example environment hosted in 2 AWS regions, with some compute capacity in GCP, and some on-prem servers:
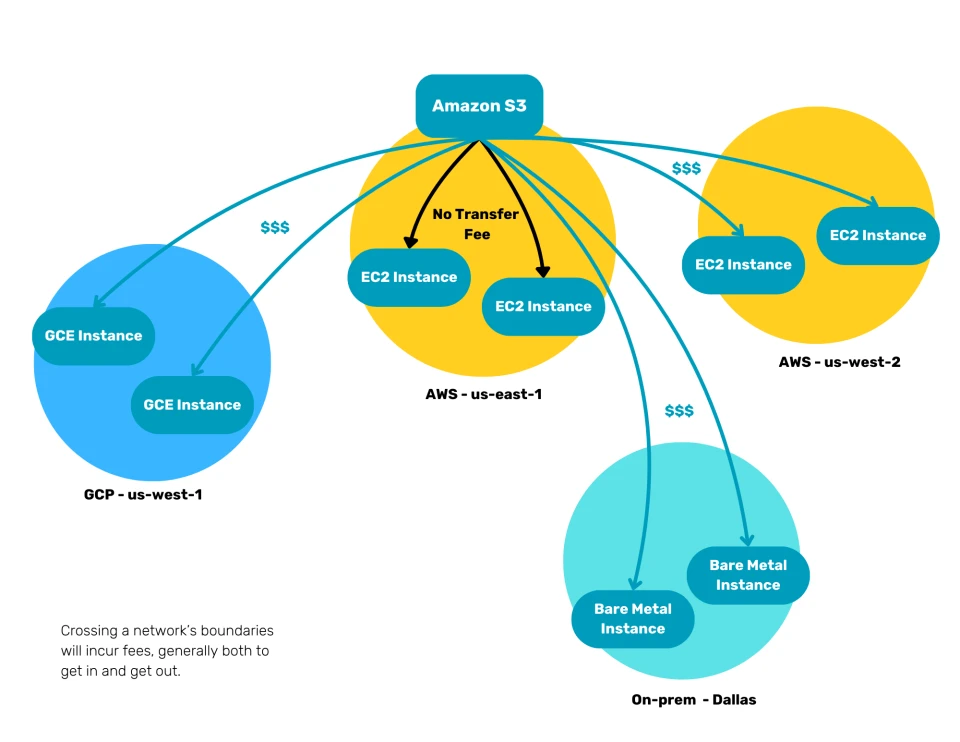
Fetching content from the S3 bucket on the EC2 instances in the AWS us-east-1 datacenter, will come at no extra data transfer cost. Fetching that same content on EC2 instances in the AWS us-west-2 data center, will cost you about $0.02 per gigabyte.
But when you start accessing the S3 bucket from other clouds, or on-premise hardware, it can become really expensive, with data transfer starting at around $0.09 per gigabyte.
How does an S3 shield work?
The idea behind an S3 shield is that you cache a copy of commonly requested S3 objects in specific locations where they are frequently requested.
Because of the close proximity between user and cache, network latency reduces and performance increases. Because of the caching, frequent access to the S3 bucket in the Cloud is no longer required, which reduces also your AWS bill.
Cost reduction
As you can see in the diagram below, the Varnish-powered S3 shield will store copies of popular S3 objects on a server in the AWS us-west-2 data center, in the GCP cloud, and in the on-premise environment.
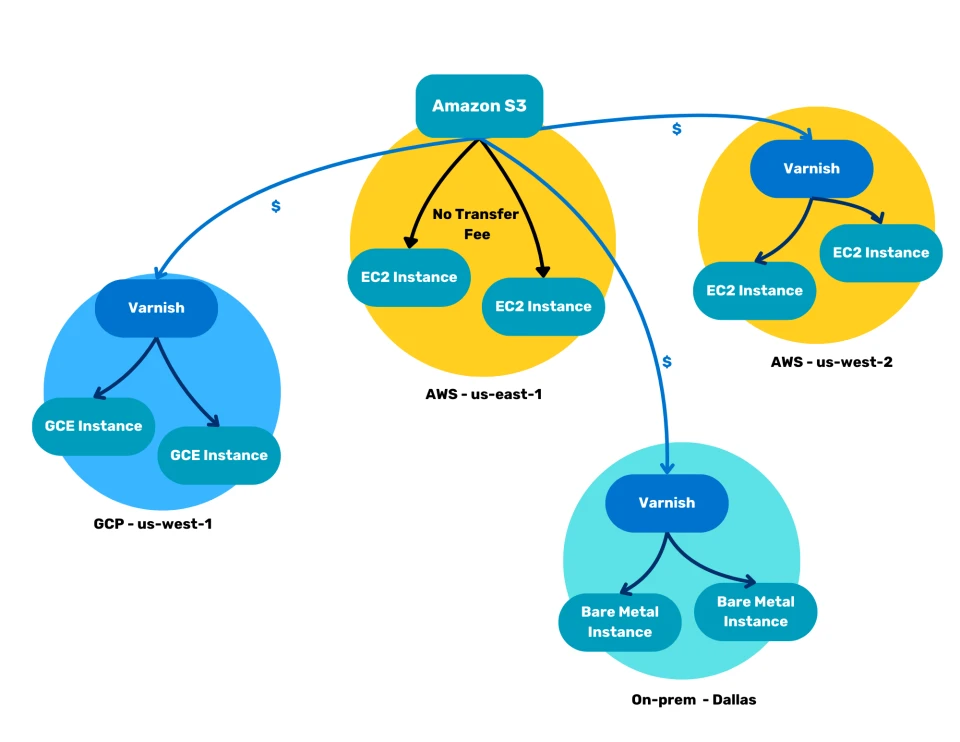
At first it looks like simple duplication of content, which adds complexity and is harder to manage. However, that is not the case: because Varnish is a reverse caching proxy, it only stores the S3 objects in the cache for a limited amount of time. Varnish also knows how to revalidate the content and where to fetch updates from.
Fetching uncached S3 objects and revalidating expired objects, will still require data transfer from the S3 bucket, but retrieving cached versions of these objects will require zero interaction with S3, and will significantly reduce your AWS bill.
Latency reduction
These same mechanisms will not just reduce cost, but will also reduce network latency. By storing a copy of the content close to the consuming user or system, the physical distance is reduced, which generally improves network latency. The diagram below describes this:
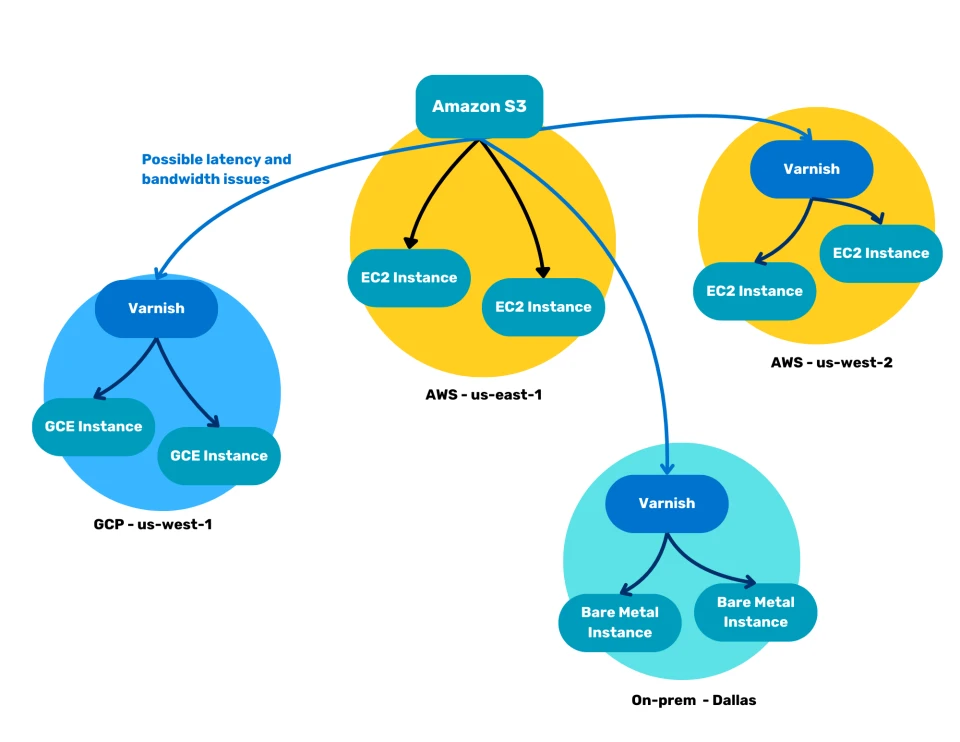
Depending on the interconnection you have between the S3 bucket and the remote sites, latency may still occur. Once the content is stored in the cache, network latency shouldn’t be a factor anymore.
Why use Varnish Enterprise as an S3 shield?
Varnish is known as a powerful, flexible and lightweight reverse caching proxy. It respects HTTP’s built-in caching conventions, and allows far-reaching customization of the caching policies thanks to the built-in Varnish Configuration Language.
Varnish Enterprise, the commercial version of Varnish, offers a dedicated S3 module, and a set of AWS-specific VCL scripts that allow easy access to S3 buckets that are protected by an authorization layer.
Setting up the S3 shield
Requirements
Before we can deploy the S3 shield you’ll need the following:
- An S3 bucket with objects that require shielding & acceleration. For example https://varnish-example.s3.us-east-1.amazonaws.com/.
- AWS access credentials to succesfully connect Varnish to your S3 bucket.
- A Varnish Enterprise license. Get in touch with us if you haven’t get a license yet, or use an AMI from a cloud marketplace.
- Hardware or a platform to deploy your Varnish Enterprise caches. We’ll explain how to install and configure Varnish Enterprise on the various supported platforms later in this tutorial.
- The platform-specific automation scripts we distribute on https://github.com/varnish/toolbox/tree/main/s3-shield.
Configuration
The shield is split between logic, in the form of this default.vcl and a s3.conf configuration file that stores the S3 bucket address, the TTL and access credentials. Here’s an example configuration:
s3_bucket_address = <bucket_name>.s3.<region>.amazonaws.com:443
s3_ttl = 100s
aws_access_key_id = AKIA*********
aws_secret_access_key = *******************
The s3_bucket_address value contains the name of the bucket, the region where it is hosted, and the port. Here’s an example of a real S3 bucket address: varnish-example.s3.us-east-1.amazonaws.com:443.
The s3_ttl configuration parameter defines how long Varnish can cache S3 objects.
In order to properly configure the S3 shield, you need to set the AWS_SHARED_CREDENTIALS_FILE and the AWS_CONFIG_FILE environment variables. These variables refer to the file where the corresponding data is stored. In our case this information is stored in s3.conf, which means both environment variables can point to the same file.
In its most simplistic form, you can use the environment variables as follows:
export AWS_SHARED_CREDENTIALS_FILE=/etc/varnish/s3.conf
export AWS_CONFIG_FILE=/etc/varnish/s3.conf
varnishd -F -f /etc/varnish/default.vcl -a :6081
aws/auto_init.vcl and aws/sign.vcl are part of the Varnish Enterprise installation. You don’t need to deploy these files yourself, and Varnish will know where to find them when included.In practice though, you may want a more integrated way to deploy those files, like ansible or helm, which the next sections cover.
Deploying an S3 shield with Ansible
If you’re planning to deploy an S3 shield to a physical server or virtual machine, you can leverage our Ansible playbook to facilitate the deployment.
You can find the Ansible playbook and associated config files on GitHub.
View the Ansible playbook on GitHub →- Before you run the Ansible playbook, make sure you have a Varnish Enterprise repository token, or ensure Varnish Enterprise is already installed on the server.
- Add the
repository_tokenvariable to thevarssection of yourinventory.yamlfile. - Add your server(s) in the
hostssection of yourinventory.yamlfile. - Then edit the
s3.conffile and add the required configuration.
Here’s what your inventory.yaml file could look like:
s3_shields:
  vars:
    repository_token: XXXXXXXXXXXXXXXXXXXXXXXXXXXXXXXXXXXXXXXXX

  hosts:
    1.2.3.4:
    5.6.7.8:
And finally we can run the Ansible playbook to install and configure the S3 shield:
ansible-playbook -i inventory.yaml playbook.yaml
Deploying an S3 shield in the Cloud with cloud-init
If you’re planning to deploy an S3 shield to a cloud platform that offers cloud-init support, you can use our cloud-init scripts, which are hosted in GitHub.
- As always, make sure your
s3.conffile is properly configured prior to deploying. - Run the
generate_yaml.shto generate thecloud-initoutput. - Take the output from
cloud-init-s3-shield.yamlthat was generated and use that in the text field that your cloud provider offers to triggercloud-init.
Deploying on AWS, Azure, Google Cloud, or Oracle Cloud
On AWS, Azure, Google Cloud, or Oracle Cloud, we offer official Cloud images on the respective marketplaces.
This means Varnish Enterprise is pre-installed and doesn’t require the upfront purchase of a Varnish Enterprise license. The payment is handled on a per-hour basis through the marketplace.
The cloud-init script can be added in a specific input field when deploying these Cloud images. On AWS this field is called user-data, on Azure it’s called Custom data, and on Oracle Cloud you can upload the cloud-init script in the advanced options section of the installation.
Here’s how you generate the cloud-init script:
./generate_yaml.sh
And this is what the generated cloud-init-s3-shield.yaml could look like:
#cloud-config
# vim: syntax=yaml

users:
  - default
packages:
  - curl
  - gnupg
write_files:
- content: |
        czNfYnVja2V0X2FkZHJlc3MgPSBidWNrZXRfbmFtZS5zMy5yZWdpb24uYW1hem9uYXdzLmNvbTo0NDMKczNfdHRsID0gMTAwcwphd3NfYWNjZXNzX2tleV9pZCA9IEFLSUEqKioqKioqKioKYXdzX3NlY3JldF9hY2Nlc3Nfa2V5ID0gKioqKioqKioqKioqKioqKioqKgo=
  path: /var/tmp/s3conf.base64
  owner: root:root
  permissions: '0644'
- content: |
    [Service]
    Environment="AWS_SHARED_CREDENTIALS_FILE=/etc/varnish/s3.conf"
    Environment="AWS_CONFIG_FILE=/etc/varnish/s3.conf"
    ExecStart=
    ExecStart=/usr/sbin/varnishd -a :80 -a 127.0.0.1:8443,proxy -S /etc/varnish/secret -T localhost:6082 -f /etc/varnish/s3shield.vcl -s mse -p syslog_cli_traffic=off
  path: /etc/systemd/system/varnish.service.d/override.conf
  owner: root:root
  permissions: '0644'
- content: |
        dmNsIDQuMTsKCmltcG9ydCBzdGQ7CmltcG9ydCBrdnN0b3JlOwppbXBvcnQgaGVhZGVycGx1czsKaW1wb3J0IHMzOwoKaW5jbHVkZSAiYXdzL2F1dG9faW5pdC52Y2wiOwppbmNsdWRlICJhd3Mvc2lnbi52Y2wiOwppbmNsdWRlICJjbHVzdGVyLnZjbCI7CgpiYWNrZW5kIGRlZmF1bHQgbm9uZTsKCnN1YiB2Y2xfaW5pdCB7CglpZiAoIWF3c19jb25maWcuZ2V0KCJyZWdpb24iKSkgewoJCWlmIChhd3NfY29uZmlnLmdldCgiczNfYnVja2V0X2FkZHJlc3MiKSB+ICIuKlwuczNcLihbXi5dKylcLmFtYXpvbmF3c1wuY29tLioiKSB7CgkJCWF3c19jb25maWcuc2V0KCJyZWdpb24iLCByZWdzdWIoYXdzX2NvbmZpZy5nZXQoInMzX2J1Y2tldF9hZGRyZXNzIiksICIuKlwuczNcLihbXi5dKylcLmFtYXpvbmF3c1wuY29tLioiLCAiXDEiKSk7CgkJfSBlbHNlIGlmIChhd3NfY29uZmlnLmdldCgiYWxnb3JpdGhtIikgPT0gIkdPT0c0LVJTQS1TSEEyNTYiKSB7CgkJCWF3c19jb25maWcuc2V0KCJyZWdpb24iLCAibm8tcmVnaW9uIik7CgkJfSBlbHNlIHsKCQkJcmV0dXJuIChmYWlsKCJyZWdpb24gd2Fzbid0IHNldCBhbmQgY291bGRuJ3QgYmUgZXh0cmFjdGVkIGZyb20gczNfYnVja2V0X2FkZHJlc3MiKSk7CgkJfQoJfQoJYXdzX2NvbmZpZy5zZXQoInMzX2J1Y2tldF9ob3N0IiwgcmVnc3ViKGF3c19jb25maWcuZ2V0KCJzM19idWNrZXRfYWRkcmVzcyIpLCAiOlswLTldKyQiLCAiIikpOwoKCW5ldyBidWNrZXQgPSBzMy5kaXJlY3RvcihyZWdzdWIoYXdzX2NvbmZpZy5nZXQoInMzX2J1Y2tldF9hZGRyZXNzIiksICJeKFthLXpBLVowLTkuLV0rKVxcLnMzXFwuLiokIiwgIlwxIiksIHJlZ3N1Yihhd3NfY29uZmlnLmdldCgiczNfYnVja2V0X2FkZHJlc3MiKSwgIi4qXC5zM1wuKFteLl0rKVwuYW1hem9uYXdzXC5jb20uKiIsICJcMSIpLCBhd3NfY29uZmlnLmdldCgiczNfYnVja2V0X2FkZHJlc3MiKSk7CgoJaWYgKCBzdGQuZHVyYXRpb24oYXdzX2NvbmZpZy5nZXQoInMzX3R0bCIpLCAxMjM0NTY3ODkxMjM0NTY3ODlzKSA9PSAxMjM0NTY3ODkxMjM0NTY3ODlzICkgewoJCXJldHVybiAoZmFpbCgiSW52YWxpZCBUVEwgZHVyYXRpb24sIG11c3QgYmUgYSBudW1iZXIgZm9sbG93ZWQgYnkgbXMsIHMsIG0sIGgsIGQsIHcsIG9yIHkiKSk7Cgl9IGVsc2UgaWYgKCBzdGQuZHVyYXRpb24oYXdzX2NvbmZpZy5nZXQoInMzX3R0bCIpLCAwcykgPD0gMHMgKSB7CgkJYXdzX2NvbmZpZy5zZXQoInMzX3R0bCIsICIwcyIpOwoJfQp9CgpzdWIgdmNsX3JlY3YgewoJIyBSZW1vdmUgdGhlIHF1ZXJ5IHN0cmluZyBmcm9tIHRoZSBVUkwsIHJlbW92ZSBjb29raWVzLCByZW1vdmUgYXV0aG9yaXphdGlvbiBoZWFkZXJzCglzZXQgcmVxLnVybCA9IHJlZ3N1YihyZXEudXJsLCAiXD8uKiQiLCAiIik7Cgl1bnNldCByZXEuaHR0cC5Db29raWU7Cgl1bnNldCByZXEuaHR0cC5BdXRob3JpemF0aW9uOwoJc2V0IHJlcS5odHRwLkhvc3QgPSBhd3NfY29uZmlnLmdldCgiczNfYnVja2V0X2hvc3QiKTsKCgkjIFJlcXVlc3QgbWV0aG9kIG9wdGlvbnMKCWlmIChyZXEubWV0aG9kICE9ICJHRVQiICYmIHJlcS5tZXRob2QgIT0gIkhFQUQiKSB7CgkJcmV0dXJuIChzeW50aCg0MDUsICJNZXRob2QgTm90IEFsbG93ZWQiKSk7Cgl9CgoJIyBJZiBUVEwgaXMgMHMsIHdlIHJldHVybihwYXNzKQoJaWYgKGF3c19jb25maWcuZ2V0KCJzM190dGwiKSA9PSAiMHMiKSB7CgkJcmV0dXJuKHBhc3MpOwoJfQp9CgpzdWIgdmNsX2JhY2tlbmRfZmV0Y2ggewoJc2V0IGJlcmVxLmJhY2tlbmQgPSBidWNrZXQuYmFja2VuZCgpOwoJc3RkLmxvZygiQVdTIEhvc3Q6ICIgKyBhd3NfY29uZmlnLmdldCgiczNfYnVja2V0X2FkZHJlc3MiKSk7CglzdGQubG9nKCJBV1MgUmVnaW9uOiAiICsgYXdzX2NvbmZpZy5nZXQoInJlZ2lvbiIpKTsKCSNpZiBjcmVkZW50aWFscyBoYXMga2V5IGdldCBhbmQgdXNlIHRoZSB2YWx1ZQoJaWYgKGF3c19jcmVkZW50aWFscy5nZXQoImF3c19hY2Nlc3Nfa2V5X2lkIikpIHsKCQlzdGQubG9nKCJDcmVkZW50aWFsczogWWVzIik7CgkJY2FsbCBhd3Nfc2lnbl9iZXJlcTsKCX0gZWxzZXsKCQkjIGlmIHRoZXJlIGlzIG5vIGNyZWRlbnRpYWxzIHVzZSBjYXNlCgkJc3RkLmxvZygiQ3JlZGVudGlhbHM6IE5vIik7Cgl9Cn0KCnN1YiB2Y2xfYmFja2VuZF9yZXNwb25zZSB7CglpZiAoYmVyZXNwLnN0YXR1cyA9PSAyMDApIHsKCQlzZXQgYmVyZXNwLnR0bCA9IHN0ZC5kdXJhdGlvbihhd3NfY29uZmlnLmdldCgiczNfdHRsIiksIDYwMHMpOwoJCXNldCBiZXJlc3AuZ3JhY2UgPSAxczsKCQlzZXQgYmVyZXNwLmtlZXAgPSAxeTsKCX0gZWxzZSB7CgkJc2V0IGJlcmVzcC50dGwgPSA1czsKCQlzZXQgYmVyZXNwLmdyYWNlID0gMHM7Cgl9Cn0KCnN1YiB2Y2xfYmFja2VuZF9lcnJvciB7CgkjIFJldHJ5IGJhY2tlbmQgcmVxdWVzdHMgd2hlbiBhIHRyYW5zcG9ydCBlcnJvciBvY2N1cnMuCglyZXR1cm4ocmV0cnkpOwp9Cg==
  path: /var/tmp/s3shield.base64
  owner: root:root
  permissions: '0644'
runcmd:
  - |
    TOKEN=
    if [ -n "$TOKEN" ]; then
      curl https://docs.varnish-software.com/scripts/setup.sh | TOKEN=$TOKEN INSTALL="varnish-plus" bash
    fi
  - base64 --decode /var/tmp/s3shield.base64 > /etc/varnish/s3shield.vcl
  - base64 --decode /var/tmp/s3conf.base64 > /etc/varnish/s3.conf
  - rm /var/tmp/s3shield.base64 /var/tmp/s3conf.base64
  - /usr/bin/systemctl daemon-reload
  - /usr/bin/systemctl restart varnish.service
TOKEN variable is empty in the cloud-init script, which will bypass the Varnish Enterprise install procedure.Deploying on other platforms that support cloud-init
If you’re deploying the S3 shield on another Cloud, virtualization or bare metal platform with cloud-init support, you’re going to need a Varnish Enterprise license.
You can pass the license as an argument to the generate_yaml.sh script:
./generate_yaml.sh 598320e22ea8fdf953c3a25d71d902e85b78f96800ee76d7
The generated cloud-init-s3-shield.yaml file now contains that license under the form of an install token, which will trigger the Varnish Enterprise install procedure, along with the other customizations that are part of this cloud-init script:
#cloud-config
# vim: syntax=yaml

users:
  - default
packages:
  - curl
  - gnupg
write_files:
- content: |
        czNfYnVja2V0X2FkZHJlc3MgPSBidWNrZXRfbmFtZS5zMy5yZWdpb24uYW1hem9uYXdzLmNvbTo0NDMKczNfdHRsID0gMTAwcwphd3NfYWNjZXNzX2tleV9pZCA9IEFLSUEqKioqKioqKioKYXdzX3NlY3JldF9hY2Nlc3Nfa2V5ID0gKioqKioqKioqKioqKioqKioqKgo=
  path: /var/tmp/s3conf.base64
  owner: root:root
  permissions: '0644'
- content: |
    [Service]
    Environment="AWS_SHARED_CREDENTIALS_FILE=/etc/varnish/s3.conf"
    Environment="AWS_CONFIG_FILE=/etc/varnish/s3.conf"
    ExecStart=
    ExecStart=/usr/sbin/varnishd -a :80 -a 127.0.0.1:8443,proxy -S /etc/varnish/secret -T localhost:6082 -f /etc/varnish/s3shield.vcl -s mse -p syslog_cli_traffic=off
  path: /etc/systemd/system/varnish.service.d/override.conf
  owner: root:root
  permissions: '0644'
- content: |
        dmNsIDQuMTsKCmltcG9ydCBzdGQ7CmltcG9ydCBrdnN0b3JlOwppbXBvcnQgaGVhZGVycGx1czsKaW1wb3J0IHMzOwoKaW5jbHVkZSAiYXdzL2F1dG9faW5pdC52Y2wiOwppbmNsdWRlICJhd3Mvc2lnbi52Y2wiOwppbmNsdWRlICJjbHVzdGVyLnZjbCI7CgpiYWNrZW5kIGRlZmF1bHQgbm9uZTsKCnN1YiB2Y2xfaW5pdCB7CglpZiAoIWF3c19jb25maWcuZ2V0KCJyZWdpb24iKSkgewoJCWlmIChhd3NfY29uZmlnLmdldCgiczNfYnVja2V0X2FkZHJlc3MiKSB+ICIuKlwuczNcLihbXi5dKylcLmFtYXpvbmF3c1wuY29tLioiKSB7CgkJCWF3c19jb25maWcuc2V0KCJyZWdpb24iLCByZWdzdWIoYXdzX2NvbmZpZy5nZXQoInMzX2J1Y2tldF9hZGRyZXNzIiksICIuKlwuczNcLihbXi5dKylcLmFtYXpvbmF3c1wuY29tLioiLCAiXDEiKSk7CgkJfSBlbHNlIGlmIChhd3NfY29uZmlnLmdldCgiYWxnb3JpdGhtIikgPT0gIkdPT0c0LVJTQS1TSEEyNTYiKSB7CgkJCWF3c19jb25maWcuc2V0KCJyZWdpb24iLCAibm8tcmVnaW9uIik7CgkJfSBlbHNlIHsKCQkJcmV0dXJuIChmYWlsKCJyZWdpb24gd2Fzbid0IHNldCBhbmQgY291bGRuJ3QgYmUgZXh0cmFjdGVkIGZyb20gczNfYnVja2V0X2FkZHJlc3MiKSk7CgkJfQoJfQoJYXdzX2NvbmZpZy5zZXQoInMzX2J1Y2tldF9ob3N0IiwgcmVnc3ViKGF3c19jb25maWcuZ2V0KCJzM19idWNrZXRfYWRkcmVzcyIpLCAiOlswLTldKyQiLCAiIikpOwoKCW5ldyBidWNrZXQgPSBzMy5kaXJlY3RvcihyZWdzdWIoYXdzX2NvbmZpZy5nZXQoInMzX2J1Y2tldF9hZGRyZXNzIiksICJeKFthLXpBLVowLTkuLV0rKVxcLnMzXFwuLiokIiwgIlwxIiksIHJlZ3N1Yihhd3NfY29uZmlnLmdldCgiczNfYnVja2V0X2FkZHJlc3MiKSwgIi4qXC5zM1wuKFteLl0rKVwuYW1hem9uYXdzXC5jb20uKiIsICJcMSIpLCBhd3NfY29uZmlnLmdldCgiczNfYnVja2V0X2FkZHJlc3MiKSk7CgoJaWYgKCBzdGQuZHVyYXRpb24oYXdzX2NvbmZpZy5nZXQoInMzX3R0bCIpLCAxMjM0NTY3ODkxMjM0NTY3ODlzKSA9PSAxMjM0NTY3ODkxMjM0NTY3ODlzICkgewoJCXJldHVybiAoZmFpbCgiSW52YWxpZCBUVEwgZHVyYXRpb24sIG11c3QgYmUgYSBudW1iZXIgZm9sbG93ZWQgYnkgbXMsIHMsIG0sIGgsIGQsIHcsIG9yIHkiKSk7Cgl9IGVsc2UgaWYgKCBzdGQuZHVyYXRpb24oYXdzX2NvbmZpZy5nZXQoInMzX3R0bCIpLCAwcykgPD0gMHMgKSB7CgkJYXdzX2NvbmZpZy5zZXQoInMzX3R0bCIsICIwcyIpOwoJfQp9CgpzdWIgdmNsX3JlY3YgewoJIyBSZW1vdmUgdGhlIHF1ZXJ5IHN0cmluZyBmcm9tIHRoZSBVUkwsIHJlbW92ZSBjb29raWVzLCByZW1vdmUgYXV0aG9yaXphdGlvbiBoZWFkZXJzCglzZXQgcmVxLnVybCA9IHJlZ3N1YihyZXEudXJsLCAiXD8uKiQiLCAiIik7Cgl1bnNldCByZXEuaHR0cC5Db29raWU7Cgl1bnNldCByZXEuaHR0cC5BdXRob3JpemF0aW9uOwoJc2V0IHJlcS5odHRwLkhvc3QgPSBhd3NfY29uZmlnLmdldCgiczNfYnVja2V0X2hvc3QiKTsKCgkjIFJlcXVlc3QgbWV0aG9kIG9wdGlvbnMKCWlmIChyZXEubWV0aG9kICE9ICJHRVQiICYmIHJlcS5tZXRob2QgIT0gIkhFQUQiKSB7CgkJcmV0dXJuIChzeW50aCg0MDUsICJNZXRob2QgTm90IEFsbG93ZWQiKSk7Cgl9CgoJIyBJZiBUVEwgaXMgMHMsIHdlIHJldHVybihwYXNzKQoJaWYgKGF3c19jb25maWcuZ2V0KCJzM190dGwiKSA9PSAiMHMiKSB7CgkJcmV0dXJuKHBhc3MpOwoJfQp9CgpzdWIgdmNsX2JhY2tlbmRfZmV0Y2ggewoJc2V0IGJlcmVxLmJhY2tlbmQgPSBidWNrZXQuYmFja2VuZCgpOwoJc3RkLmxvZygiQVdTIEhvc3Q6ICIgKyBhd3NfY29uZmlnLmdldCgiczNfYnVja2V0X2FkZHJlc3MiKSk7CglzdGQubG9nKCJBV1MgUmVnaW9uOiAiICsgYXdzX2NvbmZpZy5nZXQoInJlZ2lvbiIpKTsKCSNpZiBjcmVkZW50aWFscyBoYXMga2V5IGdldCBhbmQgdXNlIHRoZSB2YWx1ZQoJaWYgKGF3c19jcmVkZW50aWFscy5nZXQoImF3c19hY2Nlc3Nfa2V5X2lkIikpIHsKCQlzdGQubG9nKCJDcmVkZW50aWFsczogWWVzIik7CgkJY2FsbCBhd3Nfc2lnbl9iZXJlcTsKCX0gZWxzZXsKCQkjIGlmIHRoZXJlIGlzIG5vIGNyZWRlbnRpYWxzIHVzZSBjYXNlCgkJc3RkLmxvZygiQ3JlZGVudGlhbHM6IE5vIik7Cgl9Cn0KCnN1YiB2Y2xfYmFja2VuZF9yZXNwb25zZSB7CglpZiAoYmVyZXNwLnN0YXR1cyA9PSAyMDApIHsKCQlzZXQgYmVyZXNwLnR0bCA9IHN0ZC5kdXJhdGlvbihhd3NfY29uZmlnLmdldCgiczNfdHRsIiksIDYwMHMpOwoJCXNldCBiZXJlc3AuZ3JhY2UgPSAxczsKCQlzZXQgYmVyZXNwLmtlZXAgPSAxeTsKCX0gZWxzZSB7CgkJc2V0IGJlcmVzcC50dGwgPSA1czsKCQlzZXQgYmVyZXNwLmdyYWNlID0gMHM7Cgl9Cn0KCnN1YiB2Y2xfYmFja2VuZF9lcnJvciB7CgkjIFJldHJ5IGJhY2tlbmQgcmVxdWVzdHMgd2hlbiBhIHRyYW5zcG9ydCBlcnJvciBvY2N1cnMuCglyZXR1cm4ocmV0cnkpOwp9Cg==
  path: /var/tmp/s3shield.base64
  owner: root:root
  permissions: '0644'
runcmd:
  - |
    TOKEN=598320e22ea8fdf953c3a25d71d902e85b78f96800ee76d7
    if [ -n "$TOKEN" ]; then
      curl https://docs.varnish-software.com/scripts/setup.sh | TOKEN=$TOKEN INSTALL="varnish-plus" bash
    fi
  - base64 --decode /var/tmp/s3shield.base64 > /etc/varnish/s3shield.vcl
  - base64 --decode /var/tmp/s3conf.base64 > /etc/varnish/s3.conf
  - rm /var/tmp/s3shield.base64 /var/tmp/s3conf.base64
  - /usr/bin/systemctl daemon-reload
  - /usr/bin/systemctl restart varnish.service
Spinning up an S3 shield on AWS with the AWS CLI and cloud-init
If you want to spin up an S3 shield on AWS using the aws CLI tool, you can use the --user-data property to load a cloud-init script. You can use the generated cloud-init-s3-shield.yaml file, as illustrated below:
aws ec2 run-instances --user-data file://cloud-init-s3-shield.yaml \
     --image-id <ami-id> --profile default --count 1 --instance-type t2.micro \
     --key-name <your-keyname> --security-group-ids <security-group-id> \
     --subnet-id <subnet-id>
There are a lot of variables in this aws ec2 run-instances command: the AMI, the SSH key, the security group, and the subnet. Please replace the placeholders with the appropriate values before running the command.
The AMI id must refer to one of the Varnish Enterprise marketplace images. For example the Varnish Enterprise 6 (Ubuntu) image.
Spinning up an S3 shield on AWS with Terraform (and cloud-init)
A lot of Cloud deployments use infrastructure-as-code code tools to dynamically spin up infrastructure. In te previous paragraph we did this using the AWS CLI. Will this approach adds a level of automation, deployments aren’t fully orchestrated.
By leveraging Terraform, you can create infrastructure-as-code scripts to define the infrastructure components that are required in your project.
We created some Terraform scripts on GitHub that automatically create the required infrastructure on AWS, and uses cloud-init to install and configure the required components.
Here are the requirements:
- A working Terraform setup
- The AWS CLI, configured to access your AWS account.
- A properly configured
s3.conffile in the../cloud-init/folder. - A
cloud-init-s3-shield.yamlfile in the../cloud-init/folder that was generated by the./generate_yaml.shscript, that uses the values of thes3.conffile.
When these requirements are met, we can configure variables.tf:
- Set the deployment region through the
REGIONvariable. - Choose the instance type through the
VE6_INSTANCEvariable. - Select the public SSH key you want to use to access the server through the
KEY_NAMEvariable.
profile propery to provider data structure in provider.tf. Have a look at the AWS provider documentation on the Terraform website.When you’re ready to deploy, just run the following commands:
terraform init
terraform plan
terraform apply
The terraform init command will initialize the project, and will pull in the external dependencies, such as the provider plugins. The terraform plan command will do a dry run of the deployment, and will check for potential configuration issues. When you finally run terraform apply, the actual deployment will take place, and you can get output that looks like this:
Apply complete! Resources: 5 added, 0 changed, 0 destroyed.

Outputs:

instance_private_ip_addr = "172.31.18.28"
instance_public_ip_addr = "35.85.51.82"
Deploying an S3 shield in a Docker container
If you’re planning to deploy an S3 shield using Docker, you can use our docker-compose.yaml file to orchestrate the deployment.
For this to work, you need access to the Varnish Enterprise Docker registry to pull the quay.io/varnish-software/varnish-plus:latest Docker image.
Again, make sure your s3.conf file is properly configured prior to deploying, and located in the same directory as the docker-compose.yaml file. The docker-compose.yaml file also assumes that the default.vcl file lives in the parent directory.
Then simply run the following command to start the Docker container:
docker compose up
Varnish will be available on port 6081.
Deploying an S3 shield in Kubernetes using our Helm chart
While deploying an S3 shield in a Docker container is adds a level of portability, a lot of people don’t run standalone Docker setups. Instead the orchestrate these containers on Kubernetes clusters.
We offer Kubernetes support for deploying an S3 shield, using an extension of our Varnish Enterprise Helm Chart. The Helm configuration is also available on GitHub.
View the Helm configuration on GitHub →Deploying an S3 shield in Kubernetes is simply a matter of extending the Helm configuration, which we’ve done in this values.yaml file. Here’s what that file looks like:
---
global:
  imagePullSecrets:
    - name: varnish-pull-secret
server:
  extraEnvs:
    AWS_SHARED_CREDENTIALS_FILE: /etc/varnish/aws/s3.conf
    AWS_CONFIG_FILE: /etc/varnish/aws/s3.conf
  extraVolumes: |
    - name: varnish-s3-conf
      secret:
        secretName: varnish-s3-conf
        items:
          - key: s3.conf
            path: s3.conf
    - name: varnish-s3-vcl
      configMap:
        name: varnish-s3-vcl

  extraVolumeMounts:
    - name: varnish-s3-conf
      mountPath: /etc/varnish/aws/
      subpath: /etc/varnish/s3.conf
    - name: varnish-s3-vcl
      mountPath: /etc/varnish/default.vcl
      subPath: default.vcl

  vclConfig: ""
This configuration leverages the s3.conf and default.vcl files, which still need to be uploaded to the Kubernetes cluster prior to deployment. You can run the following commands to securely upload these files:
kubectl create configmap varnish-s3-vcl --from-file=../default.vcl
kubectl create secret generic varnish-s3-conf --from-file=./s3.conf
We assume the following:
- You have access to a working Kubernetes cluster, which is accessible through the
kubectlcommand. - You have setup and configured our Helm Chart repository to access the Varnish Enterprise Helm Chart.
- You have configured an Image Pull Secret on your Kubernetes cluster, named
varnish-pull-secret, to access the Varnish Enterprise Docker image. - The
default.vclfile is located in the parent folder. - You properly configured your
s3.conffile, which is located in the current directory. - You ran the
kubectlcommand to uploaddefault.vclands3.confto your Kubernetes cluster.
Then it’s just a matter of running the following command to spin up an S3 shield deployment on your Kubernetes cluster:
helm install -f values.yaml varnish-enterprise varnish/varnish-enterprise
This deployment will expose the Varnish Enterprise pod in your Kubernetes cluster using a NodePort type service. This service will bind ports 80 for HTTP and 443 for HTTPS to a TCP port on the host system. Run kubectl get svc to figure out what the destination port is.